ChatGPT Image Generation: What's New and How to Build It Programmatically
A walkthrough of the latest ChatGPT image features and how to ship equivalent output from your own code
If you've used ChatGPT recently for image generation, you'll have noticed it feels different. Text renders crisply instead of melting into squiggles. Characters stay consistent across edits. Aspect ratios are easier to control. The output looks closer to what a senior designer would hand back — not a chaotic first draft.
Under the hood, that polish comes from the GPT Image 2 family — the generation of OpenAI image models that replaced the earlier GPT Image 1.5 (retired from the platform in June 2026). The good news for developers: you don't have to use ChatGPT to get the output. The same models are available through a simple async task API. This guide walks through what actually changed and shows the minimum code to reproduce equivalent results from your own application.
What Changed in ChatGPT's Image Generation
The visible improvements in the ChatGPT product are downstream of three model-level upgrades:
- Sharper text rendering. Earlier image models could approximate letters but rarely produced a readable headline. The new family renders typography reliably — including custom case, multiple lines, and stylized fonts. Posters, mockups, and labeled diagrams finally come out usable.
- Better character and scene consistency. Reference inputs and prior outputs are honored more carefully. Doing iterative edits (same character, new pose; same poster, new headline) no longer requires re-rolling the whole composition.
- Higher resolution and detail. Output now extends up to 4K with noticeably finer texture work — pores, fabric weave, foliage, gravel patterns — that previously washed out.
A quick stress test on the typography point, generated through the API call shown below:

Every letter is correct. No partial spellings, no warped glyphs. That's the headline difference versus the previous generation.
The Models Behind the Update
The GPT Image 2 family powers the new ChatGPT image experience, and every variant is exposed through the same API. The trade-offs:
| Model | Best for | Price per image (1K) |
|---|---|---|
gpt-image-2-beta | Quick prototyping, draft variants, high-volume pipelines | $0.02 |
gpt-image-2 | General production, balanced quality and cost | $0.03 |
gpt-image-2-pro | High-stakes output where reliability matters more than cost | $0.35 |
A few non-obvious points:
gpt-image-2launched cheaper than the model it replaced — GPT Image 1.5 sold at $0.05 per image before it was retired. The price drop reflects a more efficient pipeline, not a quality compromise —gpt-image-2is the current flagship for most workflows.gpt-image-2-prois the variant tuned for stability: lower variance across runs, higher prompt adherence, fewer reroll attempts needed in production. Use it when "the first generation must be shippable" is a real requirement.- Every variant takes the same prompt field through the same task endpoint, so swapping models is a model-name change plus a glance at that variant's
inputfields.
For the full per-resolution breakdown of these tiers — 1K vs. 2K vs. 4K pricing — see the GPT Image 2 API pricing guide.
Calling the Models From Your Code
Every model on the hiapi platform — image and video alike — speaks the same unified async task API: POST /v1/tasks creates a generation task and returns a task ID immediately, then GET /v1/tasks/:id reports status and, once finished, the output URL. Model-specific parameters go inside the input object. Two calls, no SDK required.
Python
import time, requests
API = "https://api.hiapi.ai/v1/tasks"
HEADERS = {"Authorization": "Bearer YOUR_HIAPI_KEY"}
# 1. Create the task
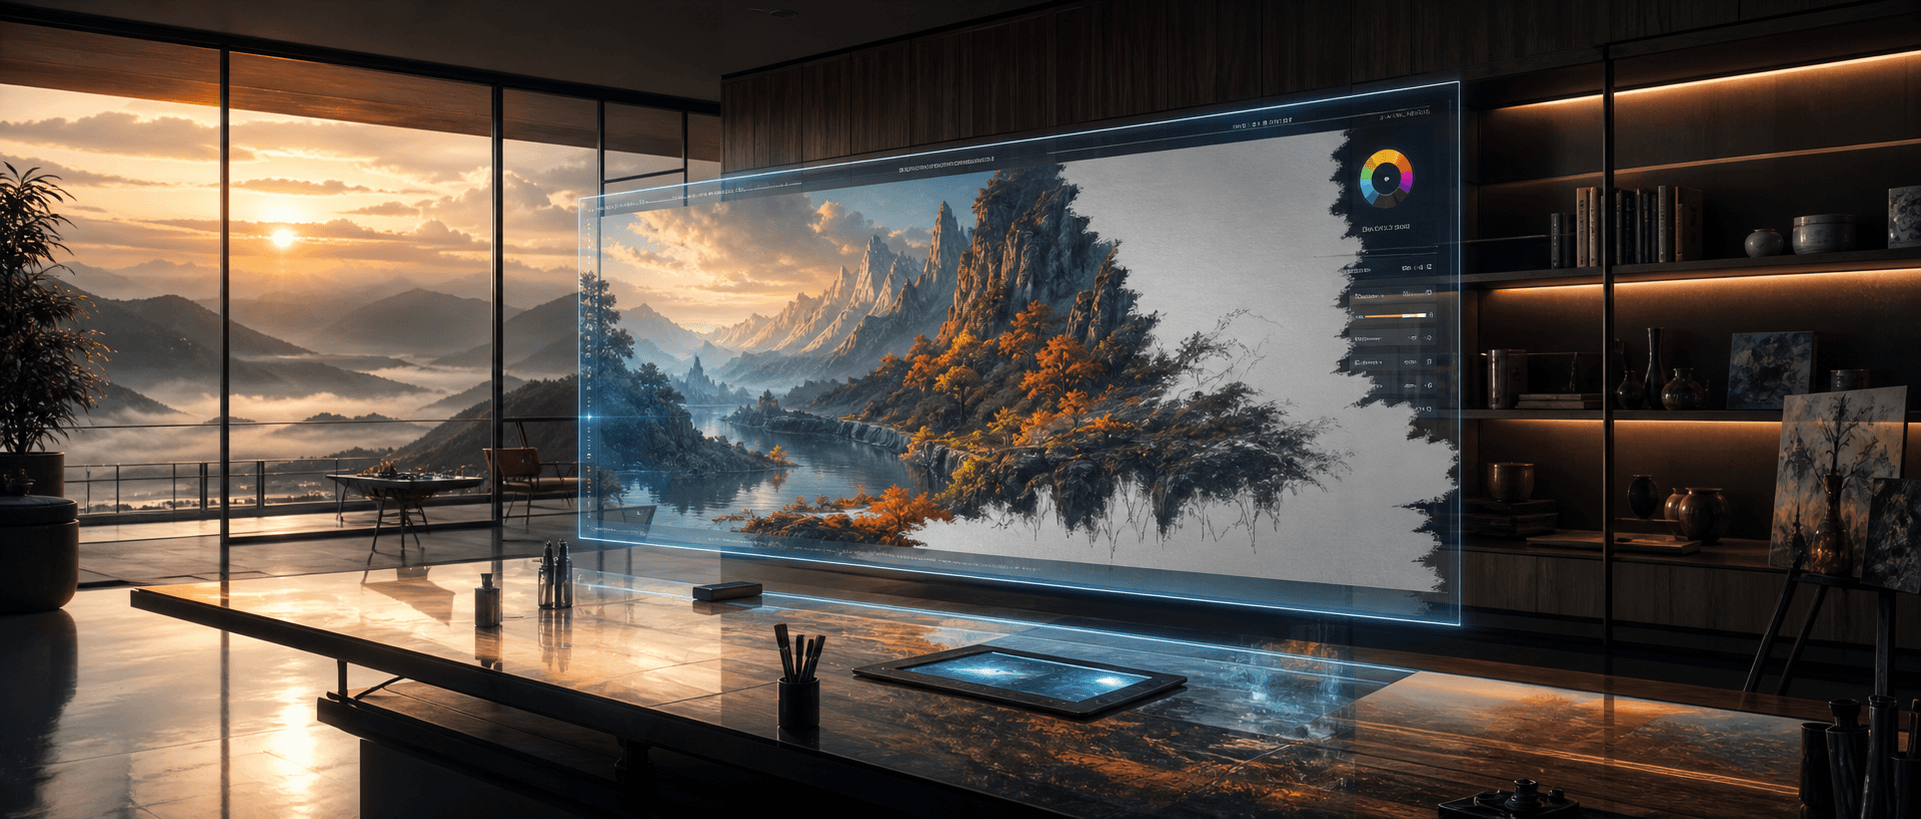
resp = requests.post(API, headers=HEADERS, json={
"model": "gpt-image-2/text-to-image",
"input": {
"prompt": "A modern minimalist digital art studio at dawn, "
"a floating holographic canvas displaying a half-painted "
"vibrant landscape, cinematic ultrawide, photorealistic",
"aspect_ratio": "3:2",
"resolution": "1K",
},
})
task_id = resp.json()["data"]["taskId"]
# 2. Poll until the task reaches a terminal state
while True:
task = requests.get(f"{API}/{task_id}", headers=HEADERS).json()["data"]
if task["status"] in ("success", "fail"):
break
time.sleep(5)
# 3. Download the result
image_url = task["output"][0]["url"]
open("output.png", "wb").write(requests.get(image_url).content)
That's the whole integration. The finished image comes back as a downloadable URL in output[] — no base64 decoding. One thing to note: each output carries an expireAt timestamp, so download the file (or re-store it) rather than hot-linking the URL. And if you'd rather not poll at all, pass a callback object when creating the task and hiapi will POST to your server when the job finishes.
curl
# Create the task
curl -X POST https://api.hiapi.ai/v1/tasks \
  -H "Authorization: Bearer $HIAPI_KEY" \
  -H "Content-Type: application/json" \
  -d '{
    "model": "gpt-image-2/text-to-image",
    "input": {
      "prompt": "An aerial view of a Japanese zen garden in autumn, raked white gravel, koi pond, painterly impressionist style",
      "aspect_ratio": "1:1",
      "resolution": "1K"
    }
  }'
# => { "code": 200, "data": { "taskId": "tk-hiapi-..." } }

# Poll for the result, then download it
curl -s https://api.hiapi.ai/v1/tasks/tk-hiapi-... \
  -H "Authorization: Bearer $HIAPI_KEY" \
| jq -r '.data.output[0].url' \
| xargs curl -o output.png
The result from that prompt, run end-to-end:
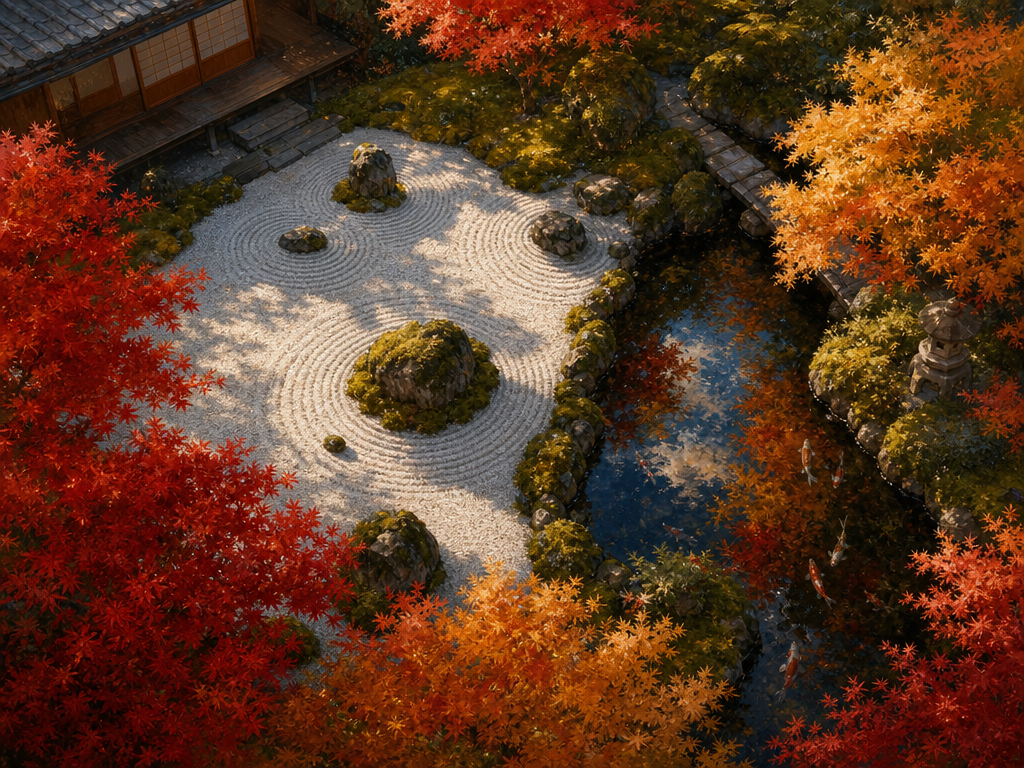
Note how the texture detail in the gravel, moss, and reflections holds up at full crop — that's the resolution and detail-pass improvement at work.
Picking Aspect Ratio and Resolution
Output shape is controlled by two input fields instead of a single pixel string: aspect_ratio sets the canvas shape and resolution sets the detail tier (1K, 2K, 4K). The three most common shapes:
"aspect_ratio": "1:1"— square. Default for social posts, thumbnails, in-app previews."aspect_ratio": "3:2"— landscape. Hero banners, blog covers, wide compositions."aspect_ratio": "2:3"— portrait. Mobile-first images, posters, product cards.
Per-image price scales with resolution tier (1K → 2K is roughly +33%, 1K → 4K is roughly double). Default to 1K and only step up when the final use surface actually rewards it — print, large-format display, or detail-critical product photography. Picking 4K out of habit doubles your bill for pixels nobody sees.
Where the Models Show Their Range
One reason gpt-image-2 is replacing earlier workflows isn't the photorealistic output — it's the range. The same model handles painterly impressionism, ornamental illustration, packaging mockups, and editorial photography from the same prompt structure. You don't need to pre-pick a "style model" the way you used to.
A single illustration-style prompt, no fine-tuning, no style-specific adapter:
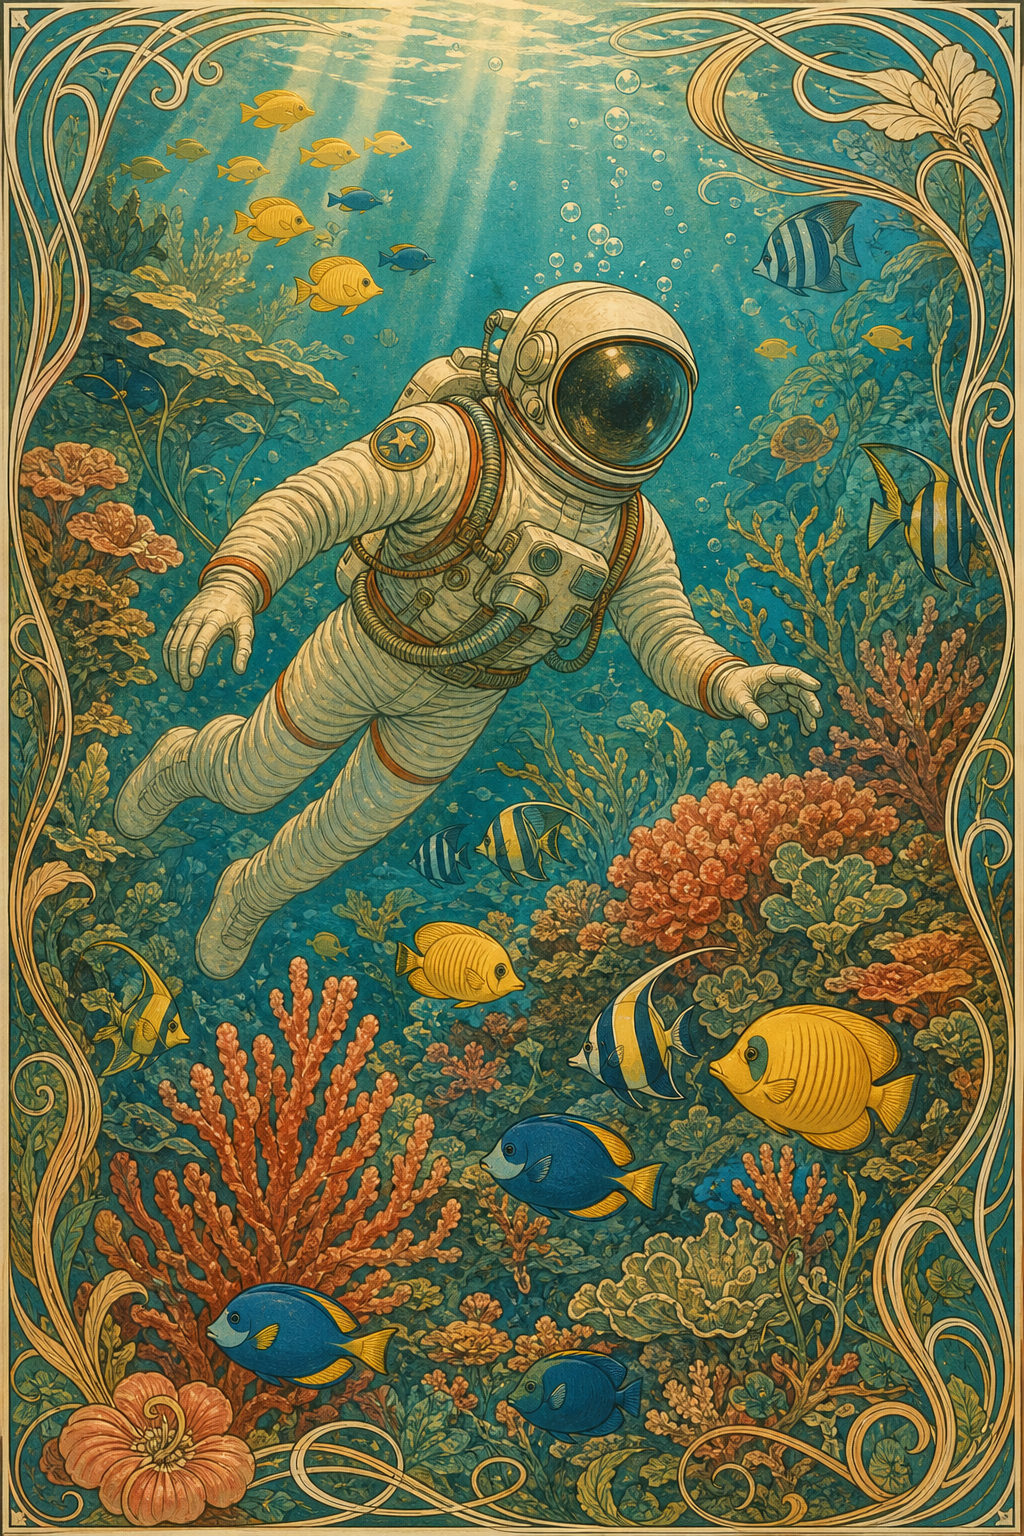
For a workflow that depends on this kind of stylistic flexibility — say, generating both photo product shots and illustrated lifestyle imagery for the same listing — keeping a single model end-to-end means one prompt template, one cost line, one upgrade path.
Practical Tips When Moving From ChatGPT to API
A few things worth knowing before you build this into a product:
- Prompt verbatim from ChatGPT often works. If you've already iterated a prompt inside ChatGPT that produces output you like, paste it into the API call — the model is the same. You don't need a separate "API-style prompt."
- Poll patiently — or use callbacks. Generation still takes 1–3 minutes end-to-end depending on model and resolution, but the async API means there is no long-held HTTP connection to time out. Poll every few seconds, or set
callback.urlwhen creating the task and let hiapi notify you on completion. - Cache by prompt + aspect ratio + resolution. If your product re-requests common prompts (template-driven mockups, A/B variant generation), keep a content-addressable cache — same input bytes, same output, no need to pay twice.
- Pick the tier per surface, not per app. Use
gpt-image-2-beta($0.02) for in-product previews and high-volume drafts where cost matters more than the last 5% of quality, andgpt-image-2(or pro) for the final asset. The prompt carries over unchanged — just check the variant'sinputfields (beta takes a pixelsize, the flagship takesaspect_ratio+resolution). - Test text rendering before shipping copy. The new family handles typography well, but unusual fonts and very long strings still occasionally drift. If a poster headline is brand-critical, generate two or three and pick the best one — far cheaper than catching it after publish.
Bottom Line
The new ChatGPT image experience is, at the API level, just the gpt-image-2 family — gpt-image-2, gpt-image-2-pro, and the budget gpt-image-2-beta — fronted by one async task endpoint. If you've been waiting to put this generation of image quality into your own product, the integration is small: POST the prompt to /v1/tasks, poll the task ID, download the URL. The output above was produced exactly that way.
Start with gpt-image-2 at 1:1 / 1K — that's $0.03 a generation and handles the majority of real-world use cases. Browse the full image and video model lineup on the hiapi pricing page, or jump straight to the GPT Image 2 model page to send your first request.