Four i2i models, one reference photo, four completely different results. Below are the exact prompts we wrote and ran ourselves — anime film still, manga panel, graffiti mural, and tarot card portrait — each paired with the real generated image and the API call to reproduce it.
The short version: pose, hairstyle, and identity survive the transfer in all four styles because every prompt explicitly says what to keep ("same pose," "same hairstyle," "same hoodie shape") alongside what to change. Drop that half of the prompt and every model we tested drifts the subject toward a generic face instead of a stylized version of yours.
Quick reference: pick your style
| Style | Model | Resolution | Price |
|---|---|---|---|
| 1. Anime film still | nano-banana-2 | 1K | $0.085/image |
| 2. Manga panel | seedream-4.5/image-to-image | 2K | $0.045/image |
| 3. Graffiti mural | grok-imagine-quality/image-to-image | 1k | $0.08/image + reference fee |
| 4. Tarot card portrait | nano-banana-2 | 1K | $0.085/image |
Prices are per single output image at the resolution shown, pulled fresh from hiapi's pricing endpoint as of 2026-09 — check hiapi's pricing page before budgeting a batch, since per-model rates change. Grok Imagine Quality's image-to-image endpoint bills a small extra per reference image on top of its base price; every call below uses exactly one reference image, so budget roughly $0.09–$0.10 total for that one.
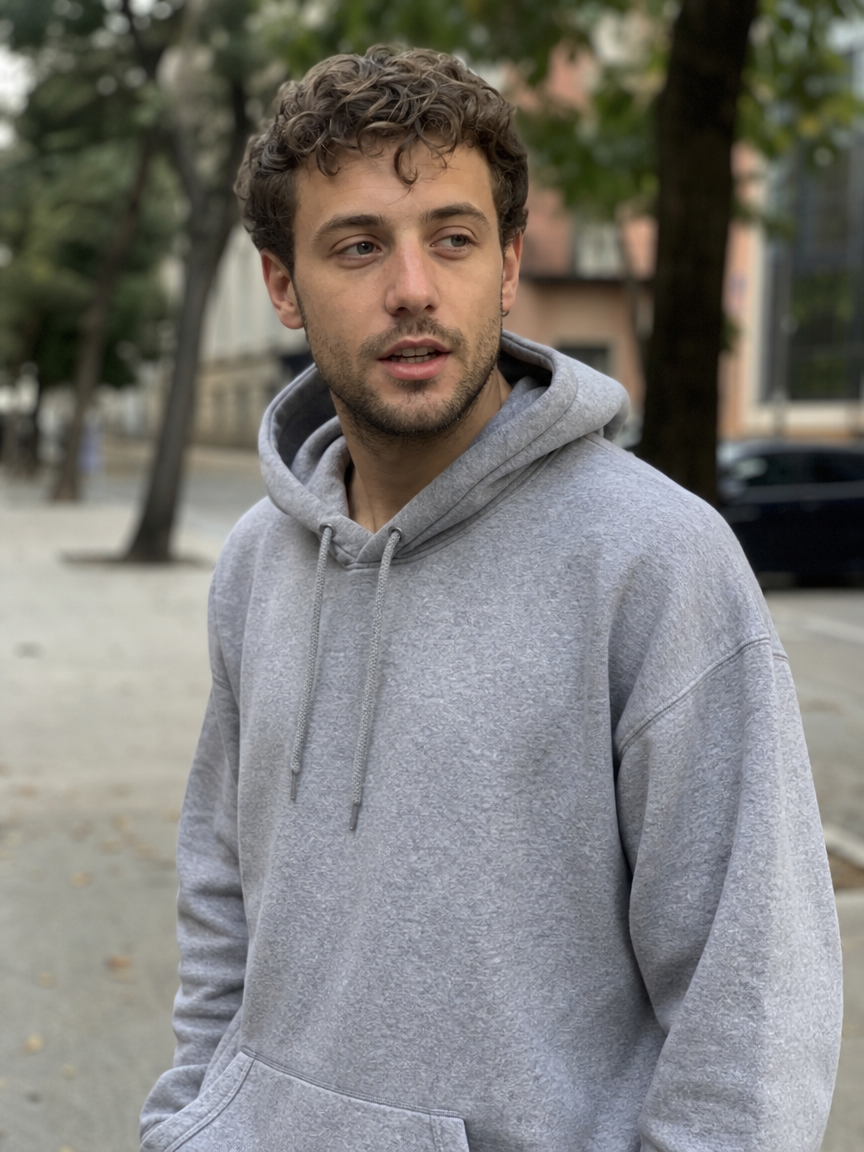
Here's the reference photo every recipe below started from:
Recipe 1: Anime film still
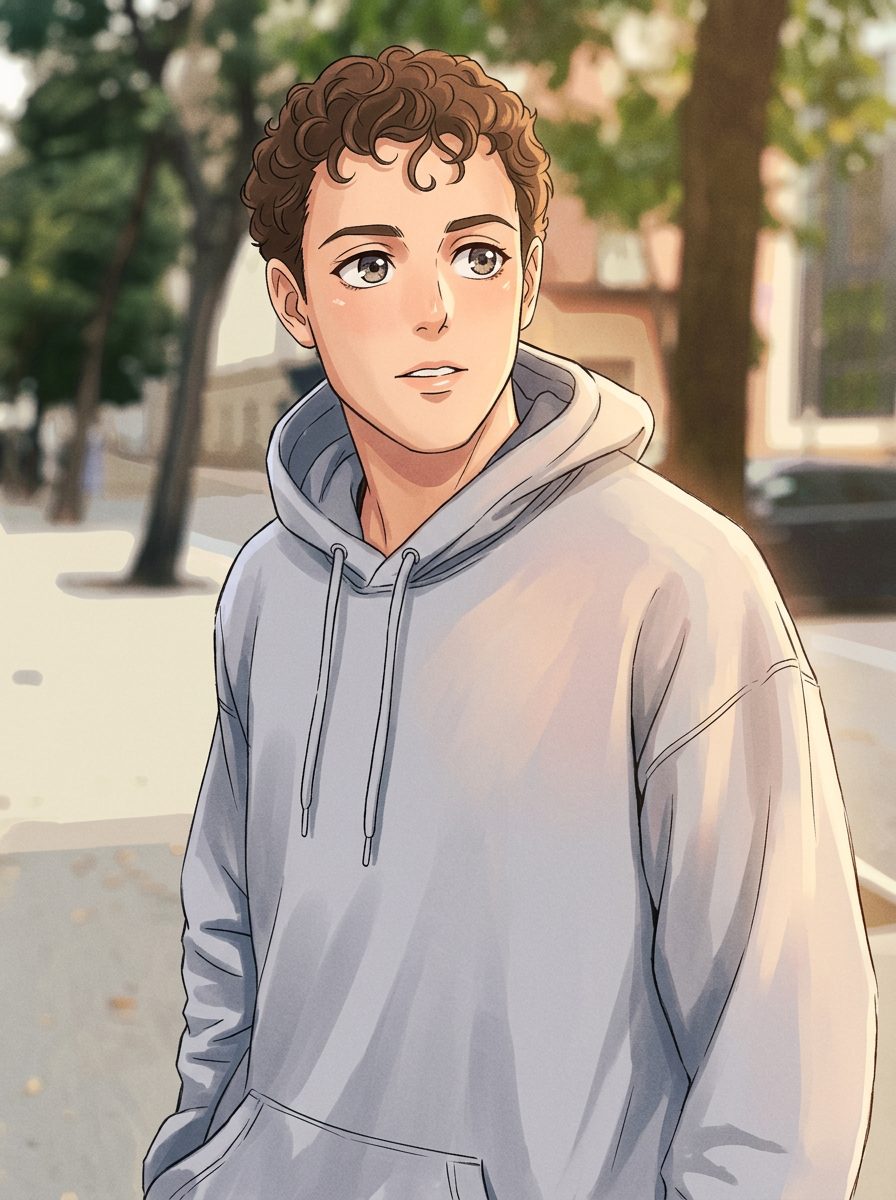
Convert this reference photo into a hand-painted Japanese anime film still: soft cel-shaded skin tones, clean thin ink linework on the face and hoodie folds, warm painterly lighting with visible brush texture, big expressive eyes redrawn in anime proportions while keeping the same hairstyle, pose, and hoodie color, soft blurred background rendered as flat anime-style color blocks with light bloom, subtle film grain, no text or watermark
Why this works: the prompt spends most of its words on texture, not subject — "cel-shaded," "visible brush texture," "light bloom" — because the subject is already fixed by the reference image. Redrawing the eyes "in anime proportions" is the one place we deliberately let the model deviate from the photo; everything else ("same hairstyle, pose, and hoodie color") is pinned down explicitly so the result still reads as the same person, just illustrated.
Reproduce it:
curl -s -X POST https://api.hiapi.ai/v1/tasks \
  -H "Authorization: Bearer $HIAPI_API_KEY" \
  -H "Content-Type: application/json" \
  -d '{
    "model": "nano-banana-2",
    "input": {
      "prompt": "Convert this reference photo into a hand-painted Japanese anime film still: soft cel-shaded skin tones, clean thin ink linework on the face and hoodie folds, warm painterly lighting with visible brush texture, big expressive eyes redrawn in anime proportions while keeping the same hairstyle, pose, and hoodie color, soft blurred background rendered as flat anime-style color blocks with light bloom, subtle film grain, no text or watermark",
      "image_input": ["https://your-cdn.example.com/portrait.jpg"],
      "aspect_ratio": "3:4",
      "resolution": "1K"
    }
  }'
Poll GET https://api.hiapi.ai/v1/tasks/{taskId} until status is success, then download output[0].url — it's time-limited, so save it somewhere permanent right away. Swap image_input for your own portrait and this prompt structure works for any subject with a clear pose and hairstyle.
Recipe 2: Black-and-white manga panel
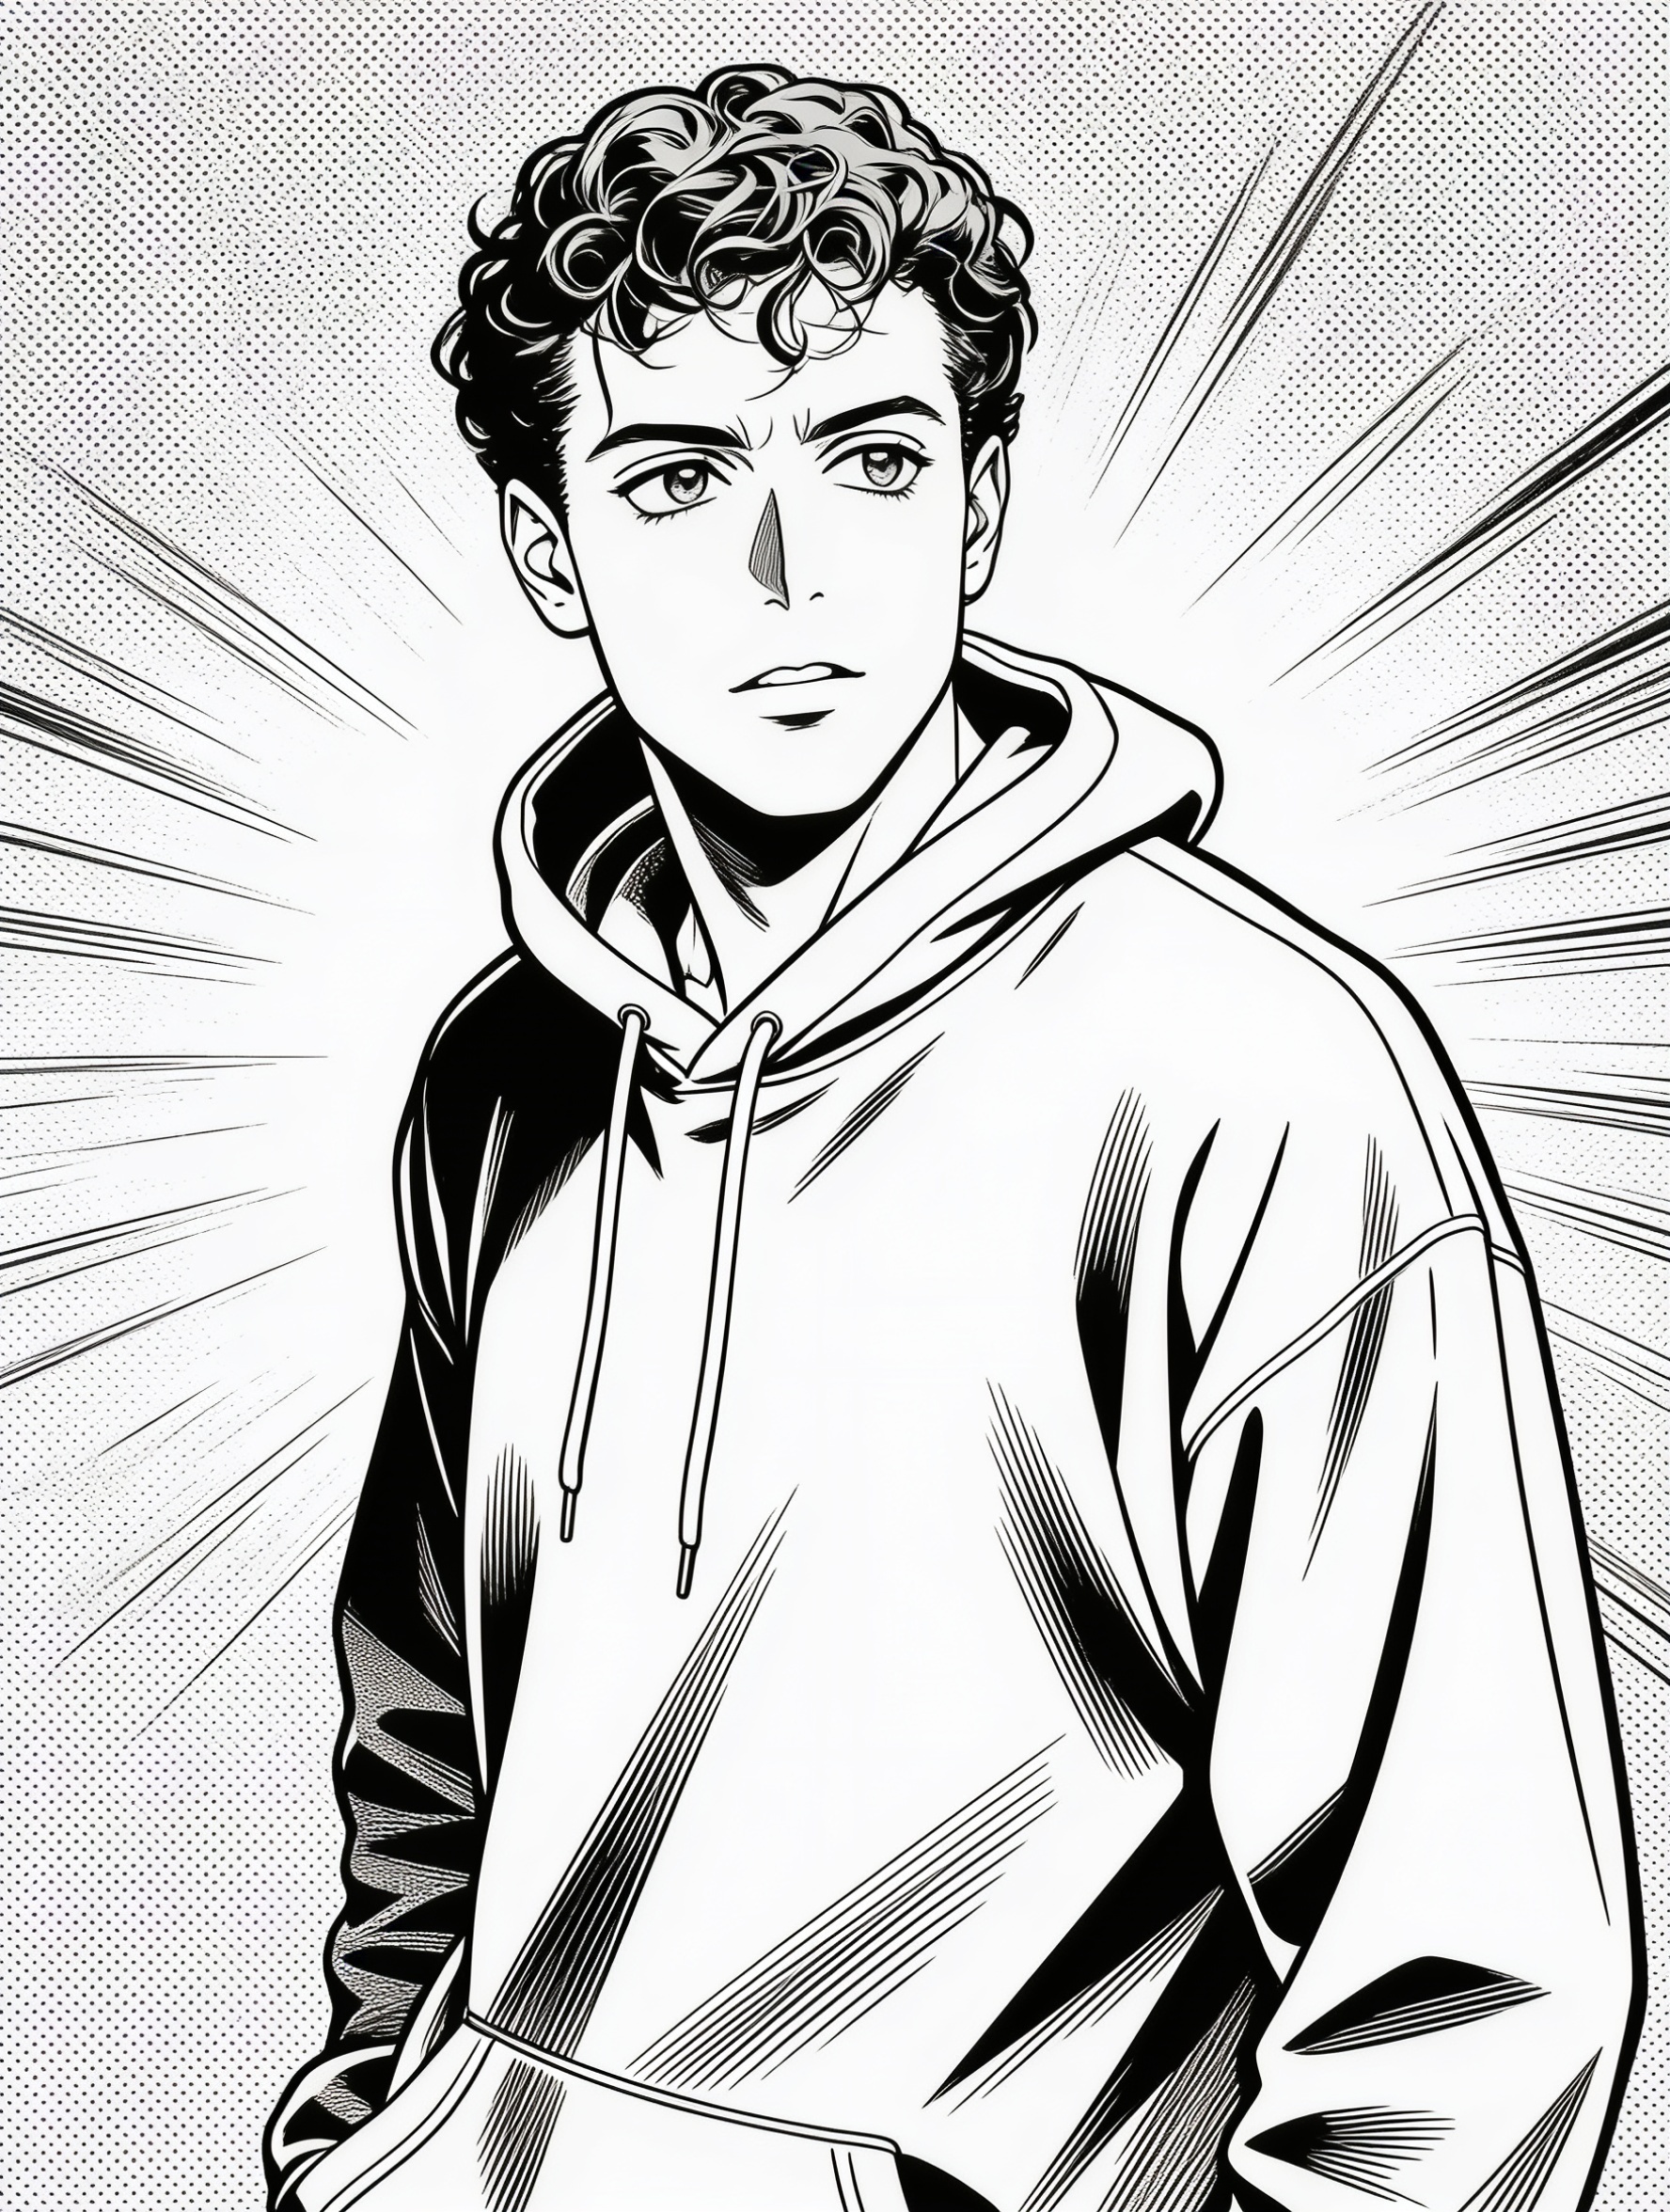
Redraw this reference photo as a black-and-white manga panel: crisp ink linework, cross-hatched shading and screentone dot patterns for gradients, high-contrast highlights on the hoodie folds and hair, sharp manga-style eyes and facial linework while preserving the same pose, hairstyle, and expression, halftone-pattern background with a faint speed-line burst behind the subject, no color, no text, no speech bubbles
Why this works: manga style lives or dies on two things this prompt names directly — screentone (the dot-pattern shading real manga uses instead of gradients) and line weight ("crisp ink linework," "sharp... facial linework"). Without naming screentone specifically, i2i models tend to default to generic anime-style flat shading instead of the halftone-dot look that actually reads as manga. "No color, no text, no speech bubbles" is there because manga-trained models sometimes hallucinate panel borders or dialogue text if you don't explicitly rule it out.
Reproduce it:
{
  "model": "seedream-4.5/image-to-image",
  "input": {
    "prompt": "Redraw this reference photo as a black-and-white manga panel: crisp ink linework, cross-hatched shading and screentone dot patterns for gradients, high-contrast highlights on the hoodie folds and hair, sharp manga-style eyes and facial linework while preserving the same pose, hairstyle, and expression, halftone-pattern background with a faint speed-line burst behind the subject, no color, no text, no speech bubbles",
    "image_urls": ["https://your-cdn.example.com/portrait.jpg"],
    "aspect_ratio": "3:4",
    "resolution": "2K"
  }
}
Same /v1/tasks POST and poll pattern as Recipe 1 — seedream-4.5/image-to-image just takes its reference under image_urls (plural, array) instead of image_input, and bills a flat $0.045 regardless of resolution tier.
Recipe 3: Spray-paint graffiti mural
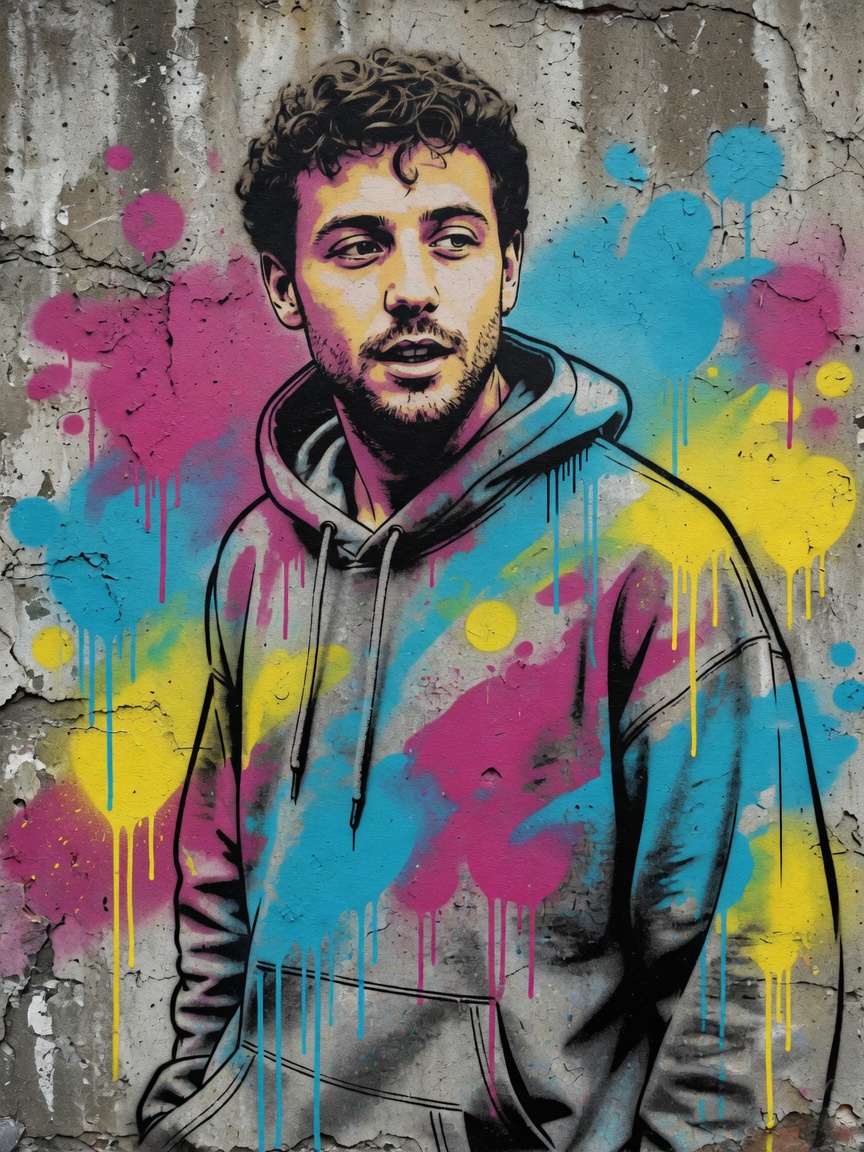
Reimagine this reference photo as a spray-painted graffiti mural portrait on a rough concrete wall: bold black outline strokes, flat saturated spray-paint color fills in magenta, cyan and yellow, visible spray texture and paint drips along the outline, subtle stencil-style highlights, keep the same pose, hairstyle, and hoodie shape as the reference, gritty urban wall texture and soft graffiti color splashes in the background, no text, no tags, no watermark
Why this works: graffiti is one of the few styles where naming the technique (stencil, spray drips, bold outline strokes) matters more than naming the subject. The color list — "magenta, cyan and yellow" — is doing real work too: leave color choice open and most i2i models default to a muddy, desaturated palette instead of the flat, saturated fills real spray-paint murals use. As with the other three recipes, "keep the same pose, hairstyle, and hoodie shape" is what stops the mural from turning into a generic street-art face.
Reproduce it:
{
  "model": "grok-imagine-quality/image-to-image",
  "input": {
    "prompt": "Reimagine this reference photo as a spray-painted graffiti mural portrait on a rough concrete wall: bold black outline strokes, flat saturated spray-paint color fills in magenta, cyan and yellow, visible spray texture and paint drips along the outline, subtle stencil-style highlights, keep the same pose, hairstyle, and hoodie shape as the reference, gritty urban wall texture and soft graffiti color splashes in the background, no text, no tags, no watermark",
    "image_urls": ["https://your-cdn.example.com/portrait.jpg"],
    "resolution": "1k"
  }
}
Note the lowercase "1k" — Grok Imagine Quality's schema is case-sensitive on resolution values, unlike the other two models above. There's no aspect_ratio field on this endpoint; output framing follows your reference image.
Recipe 4: Tarot card portrait
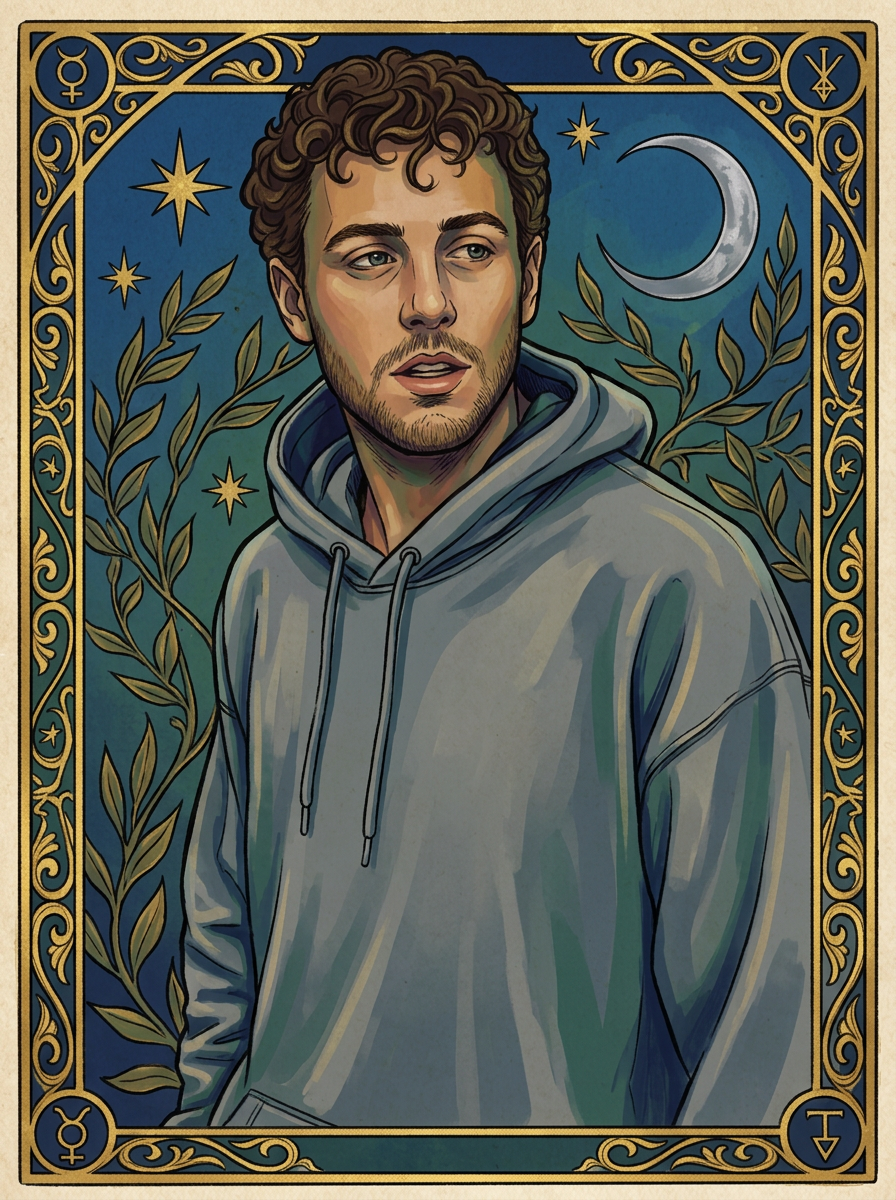
Transform this reference photo into a hand-illustrated tarot card portrait: ornate gold filigree border framing the full image like a traditional tarot card, rich jewel-toned illustration style with flat decorative shading, mystical symbolic elements (stars, crescent moon, laurel vines) worked into the background behind the subject, keep the same pose, hairstyle and hoodie silhouette redrawn in painterly tarot-art linework, subtle aged-paper texture, no text, no card name, no numerals, no watermark
Why this works: the tarot look comes almost entirely from framing elements that have nothing to do with the subject — the gold filigree border, the mystical background symbols (stars, crescent moon, laurel vines). Naming those explicitly is what turns "portrait with fancy shading" into "recognizable tarot card." We also explicitly ruled out card numerals and a card name ("no text, no card name, no numerals") since models trained on real tarot decks will add placeholder card-name text if you don't rule it out.
Reproduce it:
curl -s -X POST https://api.hiapi.ai/v1/tasks \
  -H "Authorization: Bearer $HIAPI_API_KEY" \
  -H "Content-Type: application/json" \
  -d '{
    "model": "nano-banana-2",
    "input": {
      "prompt": "Transform this reference photo into a hand-illustrated tarot card portrait: ornate gold filigree border framing the full image like a traditional tarot card, rich jewel-toned illustration style with flat decorative shading, mystical symbolic elements (stars, crescent moon, laurel vines) worked into the background behind the subject, keep the same pose, hairstyle and hoodie silhouette redrawn in painterly tarot-art linework, subtle aged-paper texture, no text, no card name, no numerals, no watermark",
      "image_input": ["https://your-cdn.example.com/portrait.jpg"],
      "aspect_ratio": "3:4",
      "resolution": "1K"
    }
  }'
Same model as Recipe 1 (nano-banana-2), different prompt — a good reminder that with i2i style transfer, the model choice matters less than how specific the prompt is about what to preserve versus reinvent.
FAQ
Which model is best for photo-to-anime style transfer?
Of the three we tested, nano-banana-2 held identity (pose, hairstyle, proportions) most consistently across repeated runs at $0.085/image (1K). seedream-4.5/image-to-image is the cheaper option at a flat $0.045/image and works well for line-art-heavy styles like manga; grok-imagine-quality/image-to-image is closer to a full repaint and suits styles like graffiti where some subject deviation is part of the look.
Do I need a specific photo for these prompts to work? A clear, front-facing or three-quarter portrait with visible hairstyle and clothing gets the most consistent results — that's what all four prompts above assume when they say "same pose, hairstyle, and hoodie." Busy backgrounds or partially obscured faces make it harder for the model to know what to preserve.
Can I combine these prompts, like an anime-style tarot card? Yes — swap the technique-specific language (cel-shading vs. screentone vs. spray texture) while keeping the framing language (tarot's gold border and symbols, or graffiti's wall texture) from a different recipe. The two halves of each prompt — subject preservation and style technique — are written to be modular.
Why do some of these prompts specify "no text" or "no watermark"? Models trained on real anime stills, manga pages, and tarot decks have seen plenty of examples with text baked in — credits, sound effects, card names — and will sometimes add placeholder text unprompted. Explicitly ruling it out heads that off; it costs nothing to add to a prompt and saves a wasted generation.
Does resolution affect price for these models?
It depends on the model. nano-banana-2 and seedream-4.5's pricing does vary by resolution tier on some endpoints, though seedream-4.5/image-to-image specifically bills a flat $0.045 regardless of tier. Always check hiapi's live pricing page before you budget a batch — rates change model to model and update independently.
Takeaways
- Every prompt above splits into two halves: what to preserve (pose, hairstyle, identity) and what to change (art style, technique, framing) — write both halves explicitly, or the model quietly drifts the subject toward something generic.
- Naming the technique, not just the target style, gets you a more accurate result: "screentone dot patterns" beats "manga style," "stencil highlights and spray drips" beats "graffiti style."
- Rule out things models tend to hallucinate for a given style — placeholder text, card numerals, speech bubbles — even when you don't think you need to.
grok-imagine-quality/image-to-imageuses lowercase resolution values ("1k", not"1K") and has noaspect_ratiofield; check each model's schema instead of assuming it matches a model you've used before.- All four prompts are copy-paste starting points — swap in your own reference photo via
image_inputorimage_urlsand the same structure carries over to a different subject.
Want to see how a single i2i model handles multiple resolution tiers and reference counts before you pick one for a batch job? The Nano Banana 2 API tutorial covers auth, request shape, and error handling in more depth. Or go straight to the nano-banana-2 model page to run your own reference photo through it.