Summary
- qwen-image-3.0-pro/image-to-image takes 1–3 reference images and a text prompt, and it holds onto structure (product silhouette, room layout, a face) far better than pure text-to-image re-rolling.
- Three copy-paste recipes below cover the three edits people actually ask for: relighting/restyling a product photo, redecorating an interior without moving the walls, and restyling a portrait while keeping the person recognizable.
- Every prompt here is one we wrote and ran ourselves — real before/after pairs, not stock examples.
- Pricing is flat and predictable: $0.0497 per image at 1K, $0.0993 at 2K, plus $0.004 per reference image you pass in (1–3 allowed). A single-reference 1K edit like the ones below costs $0.0537.
- The model keeps geometry and identity anchored to your reference — it's an editor, not a re-imaginer. If you want the model to invent a new scene from scratch, use qwen-image-3.0-pro/text-to-image instead.
Why image-to-image is a different tool than text-to-image
Text-to-image gives you a new image every time — even with the same prompt, the composition shifts. That's fine for exploration, but it's the wrong tool the moment you already have an image you like and just want to change one thing about it: swap the lighting, restyle the room, put a different outfit on the same person.
That's what image-to-image is for. You send qwen-image-3.0-pro/image-to-image an existing image (or up to three) plus a prompt describing the change, and it edits toward that prompt while anchoring to the reference's structure — the product's silhouette stays put, the room's walls and windows stay put, the person's face stays put.
We tested this against three specific failure modes we've seen from image editing models in general: warped product proportions, walls that move when you ask for new furniture, and faces that quietly turn into a different person. Here's what actually happened, with the real prompts and the real outputs.
The three recipes
Recipe 1: Relight and restyle a product photo without warping the product
Product photography is one of the most unforgiving image-to-image use cases — customers will notice immediately if the watch face changes proportions between the "studio" and "lifestyle" version of a listing photo. The test here is whether the model can change the lighting and background while leaving the product itself untouched.
Before — a flat, evenly-lit studio shot of a wristwatch on a white background:
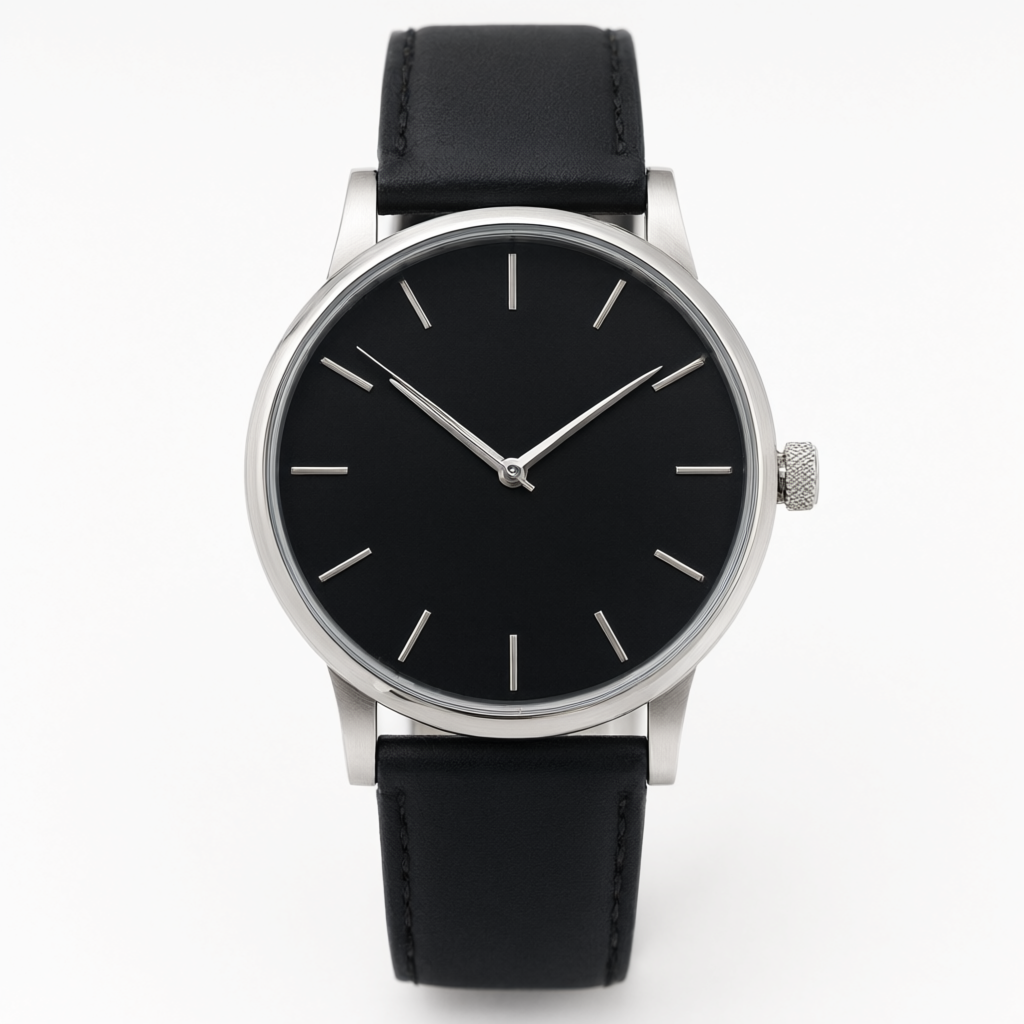
Source prompt (text-to-image, for reference — this is the starting image, not the edit):
Studio product photography of a men's stainless steel wristwatch with a
navy blue dial, placed on a pure white seamless background. Even, flat
softbox lighting, no shadows, no reflections beyond a subtle catchlight
on the crystal. Straight-on angle, watch face centered, minimal styling,
e-commerce catalog style.
After — the same watch, relit for a warm lifestyle listing photo and moved onto a walnut surface:
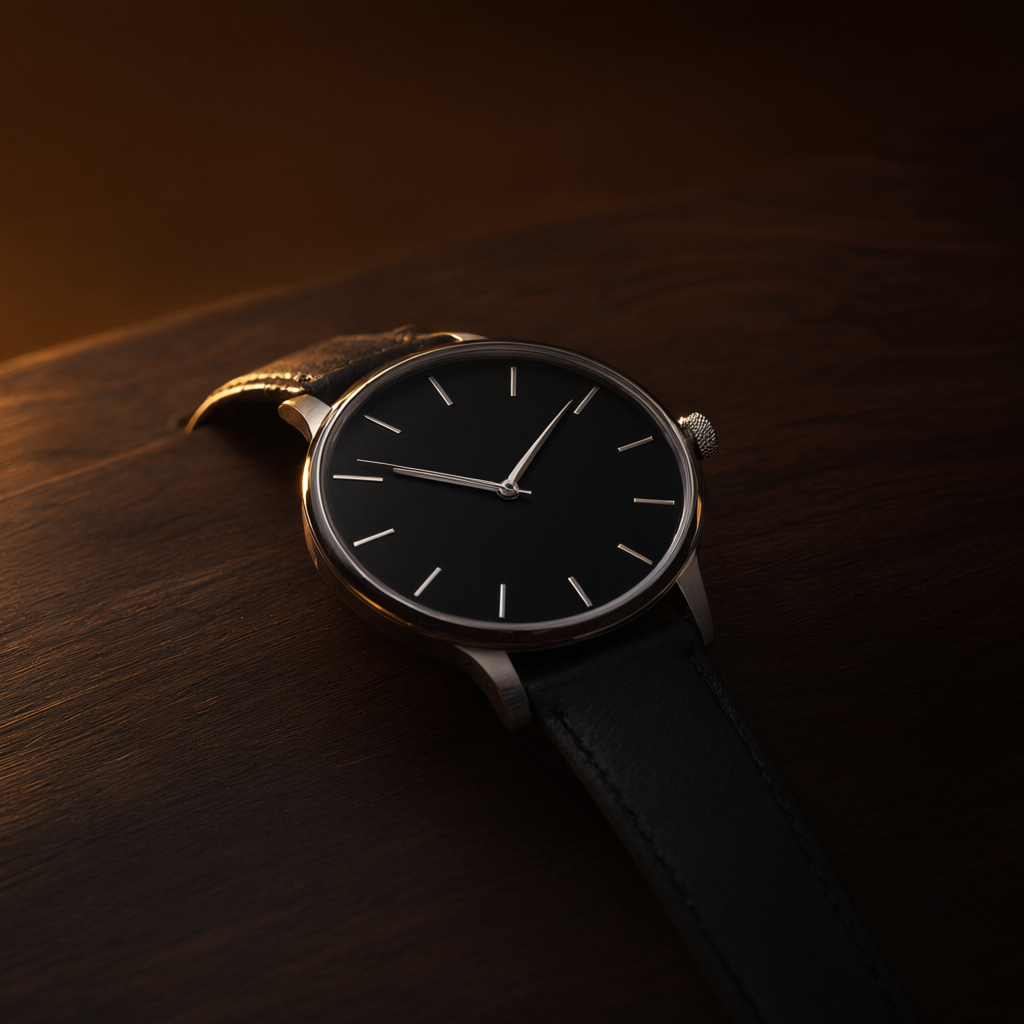
Image-to-image prompt (copy-paste, image_urls: [<the studio photo above>]):
Keep this exact watch — same case shape, same dial layout, same hands and
markers, do not redesign it. Move it onto a warm walnut wood surface,
shot at a slight 3/4 angle instead of straight-on. Change the lighting to
warm late-afternoon window light coming from the left, with a soft
natural shadow falling to the right. Add a subtle out-of-focus background
suggesting a cozy interior. This is a lifestyle e-commerce photo, not a
studio catalog shot — keep it photorealistic.
What held up: the case shape, dial layout, hand positions, and markers are unchanged — it's clearly the same watch, just under different light on a different surface. That's the bar for a product photo edit to be usable in a real listing.
Recipe 2: Redecorate a room without moving the architecture
Interior restyling is the layout-preservation test: windows, doors, and wall positions need to survive the edit, or the "after" photo reads as a different room rather than the same room redecorated.
Before — a sparse, minimalist living room:
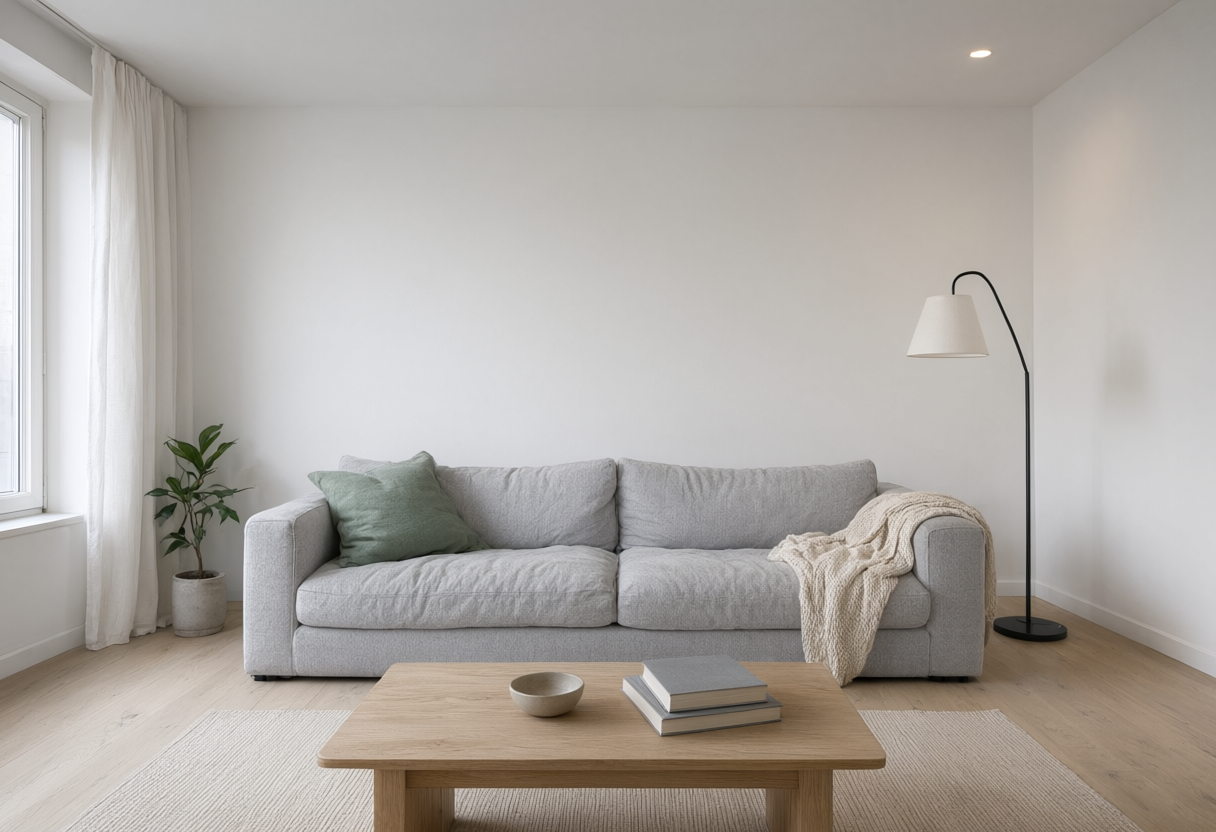
Source prompt (text-to-image, for reference):
A minimalist living room interior, white walls, one large window on the
left wall with natural daylight, light wood flooring, a single gray sofa
and a small side table, mostly empty space, architectural photography
style, wide angle.
After — the same room, restyled with mid-century modern furniture and warmer tones, window and wall positions untouched:
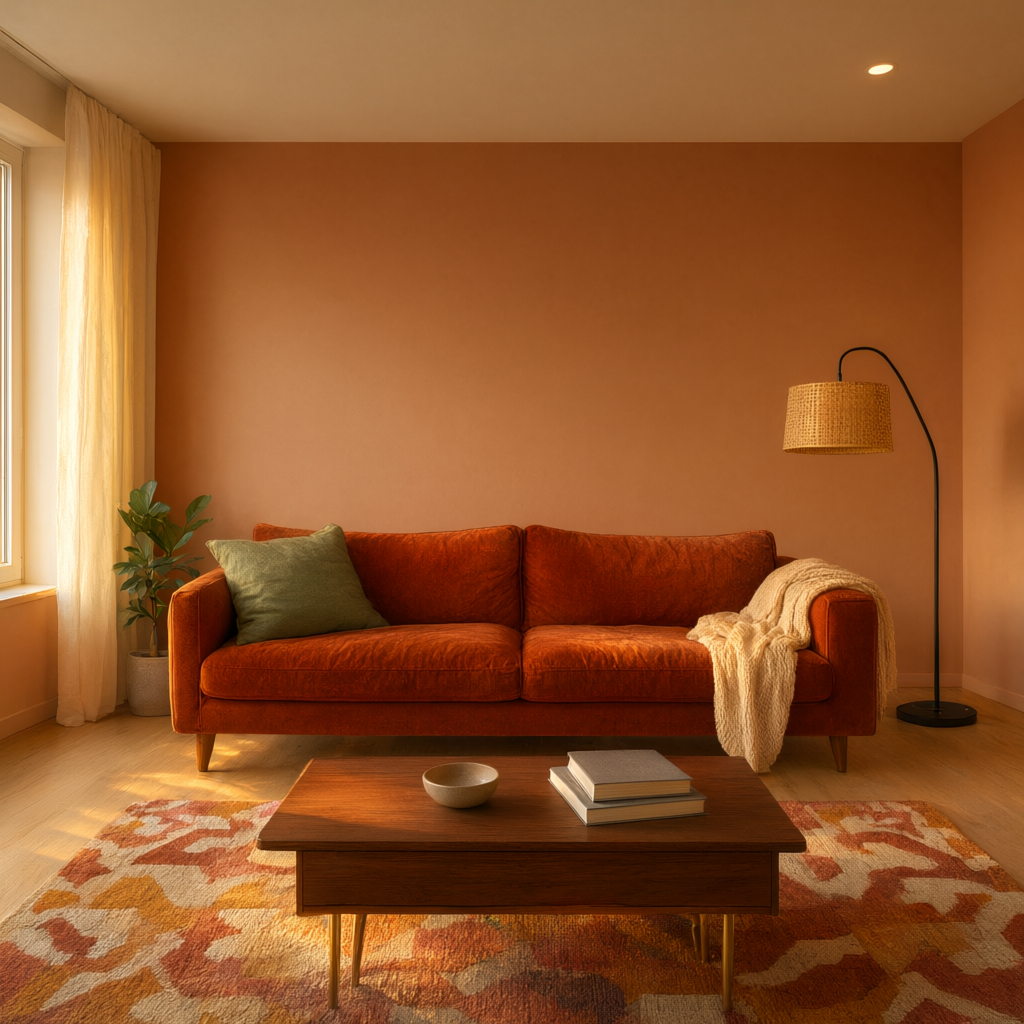
Image-to-image prompt (image_urls: [<the minimalist room above>]):
Keep the exact room layout — same wall positions, same window on the
left in the same place, same floor. Redecorate it in a mid-century
modern style: replace the gray sofa with a walnut-legged sofa in burnt
orange fabric, add a round wood coffee table, a patterned area rug, and
warm brass floor lamp. Change the wall color to a warm terracotta.
Keep the window, the daylight direction, and the room's proportions
exactly as they are — only the furnishings and color palette change.
What held up: the window stayed in the same wall, in the same place, letting in light from the same direction. The room reads as "the same room, redecorated" rather than a new room that happens to share a color scheme — which is the actual point of this kind of edit for real estate staging or interior design mockups.
Recipe 3: Restyle a portrait while keeping the person recognizable
Identity preservation is the hardest of the three: subtle drift in a face is more noticeable to a human viewer than drift in a room or a product. For this recipe we used a fully AI-generated synthetic headshot (not a real person) so we could show the technique without any likeness or consent concerns.
Before — a synthetic headshot in a plain gray hoodie against a neutral background:
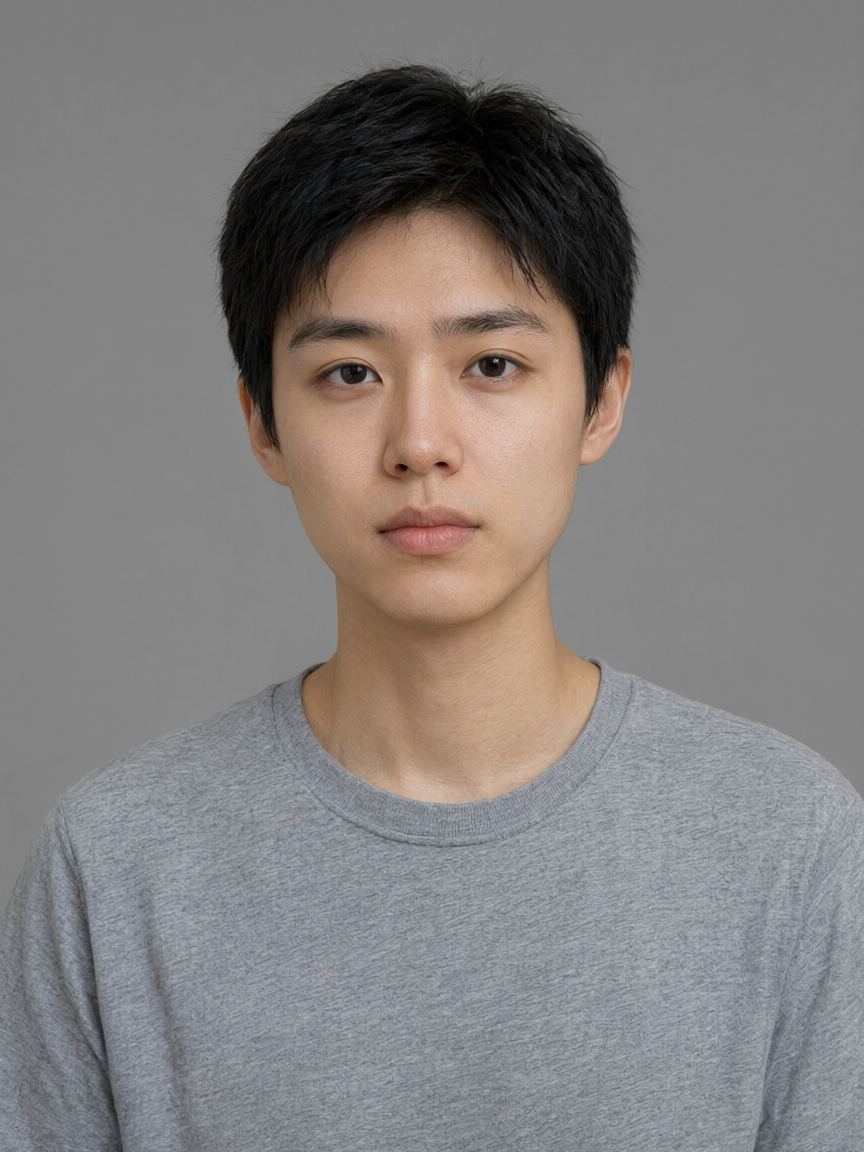
Source prompt (text-to-image, synthetic subject, for reference):
Photorealistic headshot portrait of a young adult with short dark hair,
neutral friendly expression, wearing a plain gray hoodie, soft even
studio lighting, plain light gray background, front-facing, shoulders
visible, high detail skin texture, professional photography.
After — the same face and pose, restyled into a professional editorial headshot with a blazer and blurred office background:
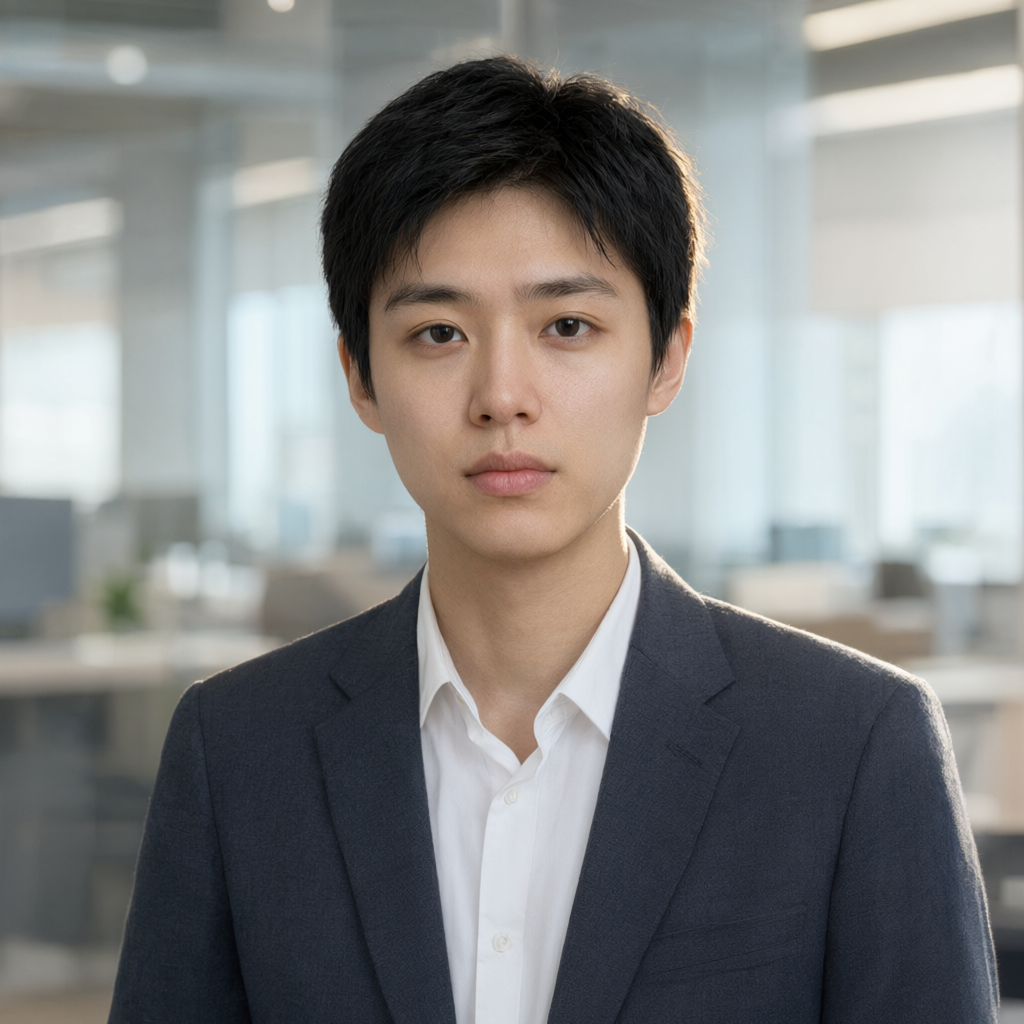
Image-to-image prompt (image_urls: [<the headshot above>]):
Keep this exact person — same face, same facial features, same hairstyle,
same head angle and expression, do not change who this is. Change their
outfit to a tailored navy blazer over a white collared shirt. Change the
background to a softly blurred modern office interior. Add gentle rim
lighting from behind to give it an editorial magazine portrait mood.
Photorealistic, shallow depth of field.
What held up: the face, hairstyle, and head angle are the same person from the source — the edit changed wardrobe, background, and lighting mood without redrawing the face. That's the difference between an image editor and an image generator that happens to look similar.
Pricing and request shape
All three edits above used the same request shape — one reference image, 1K resolution:
curl https://api.hiapi.ai/v1/tasks \
  -H "Authorization: Bearer $HIAPI_API_KEY" \
  -H "Content-Type: application/json" \
  -d '{
    "model": "qwen-image-3.0-pro/image-to-image",
    "input": {
      "prompt": "Keep this exact watch — same case shape, same dial layout...",
      "image_urls": ["https://your-image-host.example/watch-source.jpg"],
      "resolution": "1K"
    }
  }'
This returns a task ID; poll GET /v1/tasks/{id} until status is success, then download the image from output[0].url (the link expires, so save it immediately).
Pricing, current as of this writing (verify against hiapi's pricing page before budgeting at scale, since prices can change):
| Resolution | Price per image |
|---|---|
| 1K | $0.0497 |
| 2K | $0.0993 |
On top of that, each reference image you pass in image_urls (1 to 3 allowed) adds $0.004. All three edits above used exactly one reference image at 1K, so each one cost $0.0497 + $0.004 = $0.0537.
If you're deciding between resolutions: 1K is enough for web use and social; 2K is worth the extra $0.05/image if you're feeding the output into print or a large hero banner where upscaling artifacts would show.
FAQ
Can I use more than one reference image at once?
Yes — image_urls accepts 1 to 3 images. All three recipes above used a single reference, which is enough for the "edit this one image" pattern. Multiple references are useful when you want the model to combine elements from more than one source image into a single edit.
Does it work on images the model didn't generate itself?
Yes — nothing about image_urls requires the reference to have come from Qwen Image. Any accessible image URL works as the "before" image; the recipes above happen to use Qwen Image 3.0 Pro-generated sources purely so the whole before/after pair in this article is reproducible from one model family.
What if I want a completely new image instead of an edit? Use qwen-image-3.0-pro/text-to-image instead — same pricing tiers, no reference image required. If you're setting up an API integration for the first time, our qwen-image-3.0-pro API guide walks through the curl and Python request shape in more depth.
Why did you use a synthetic face for the portrait recipe instead of a real photo? To demonstrate identity-preservation without any likeness or consent issue. The technique — describing what to keep unchanged before describing the change — works the same way on a real photo.
Key takeaways
- Lead every image-to-image prompt with what should stay the same (shape, layout, identity) before describing what should change — this is the single biggest lever for keeping structure intact across the edit.
qwen-image-3.0-pro/image-to-imageaccepts 1–3 reference images at $0.004 each, on top of a flat $0.0497 (1K) / $0.0993 (2K) base price per image.- It's an editing tool, not a re-rolling tool — reach for qwen-image-3.0-pro/text-to-image when you want a fresh composition instead of a change to an existing one.
Ready to try these prompts on your own images? Grab an API key and run your first edit in the hiapi dashboard — the same /v1/tasks endpoint used above works with your own reference images out of the box.