Most product-photo problems on a catalog shoot are not "generate a new image" problems. The product is already photographed correctly — the angle, the label, the material — and what needs to go is the lint on the lid, the tape on the sweep, the cable in the lifestyle shot. Bria Eraser fits that job because it only touches the pixels you mask. You send a source photo and a black-and-white mask; whatever sits in the white area is removed and the surroundings are filled in. There is no prompt to write, and the request must not include one.
We ran four typical e-commerce cleanup cases through the hiapi API on 2026-11-03: dust on a matte case, studio props next to a bottle, clutter behind a sneaker, and a softbox reflection on a glossy mug. Every source, mask and result below is from that run.
Where Bria Eraser fits in a product-image workflow
If you need a new scene or a new background around the product, a generation model is the better starting point — see the Bria Product Shot examples. Eraser is for the step before or after that: keeping an existing photo and removing what should not ship with it.
| Cleanup job | Mask approach | Our result |
|---|---|---|
| Dust specks and lint on a dark product | Detect bright specks automatically, dilate a few pixels | Clean, no visible texture change on the lid |
| Tape, clamps, acrylic supports on a white sweep | Threshold non-white pixels, add a hand polygon for clear acrylic | Clean; fill is near-white, not pure 255 white |
| Cable and cup behind a lifestyle product | Hand-drawn polygon kept away from the product | Clean; the wall corner behind the cup was rebuilt |
| Softbox hotspot on a glossy surface | Threshold the bright area on the product body | Hotspot removed; the mug reads less glossy |
Pricing is $0.0575 per image (checked against hiapi pricing on 2026-11-03), so these four cleanups cost $0.23. All four tasks finished between 36 and 44 seconds after submission, including our own polling. That is four single runs, not a latency benchmark.
Case 1: dust and lint on a matte black case
Dark matte plastic shows every speck under overhead light. Hand-brushing 20 tiny spots on each SKU is the slow part of retouching, so we generated the mask instead: compare each pixel with a 15-pixel median of its neighbourhood, keep anything more than 22 levels brighter, limit the search to the lid, then grow each spot by 5 pixels so the soft edge of the dust is included.
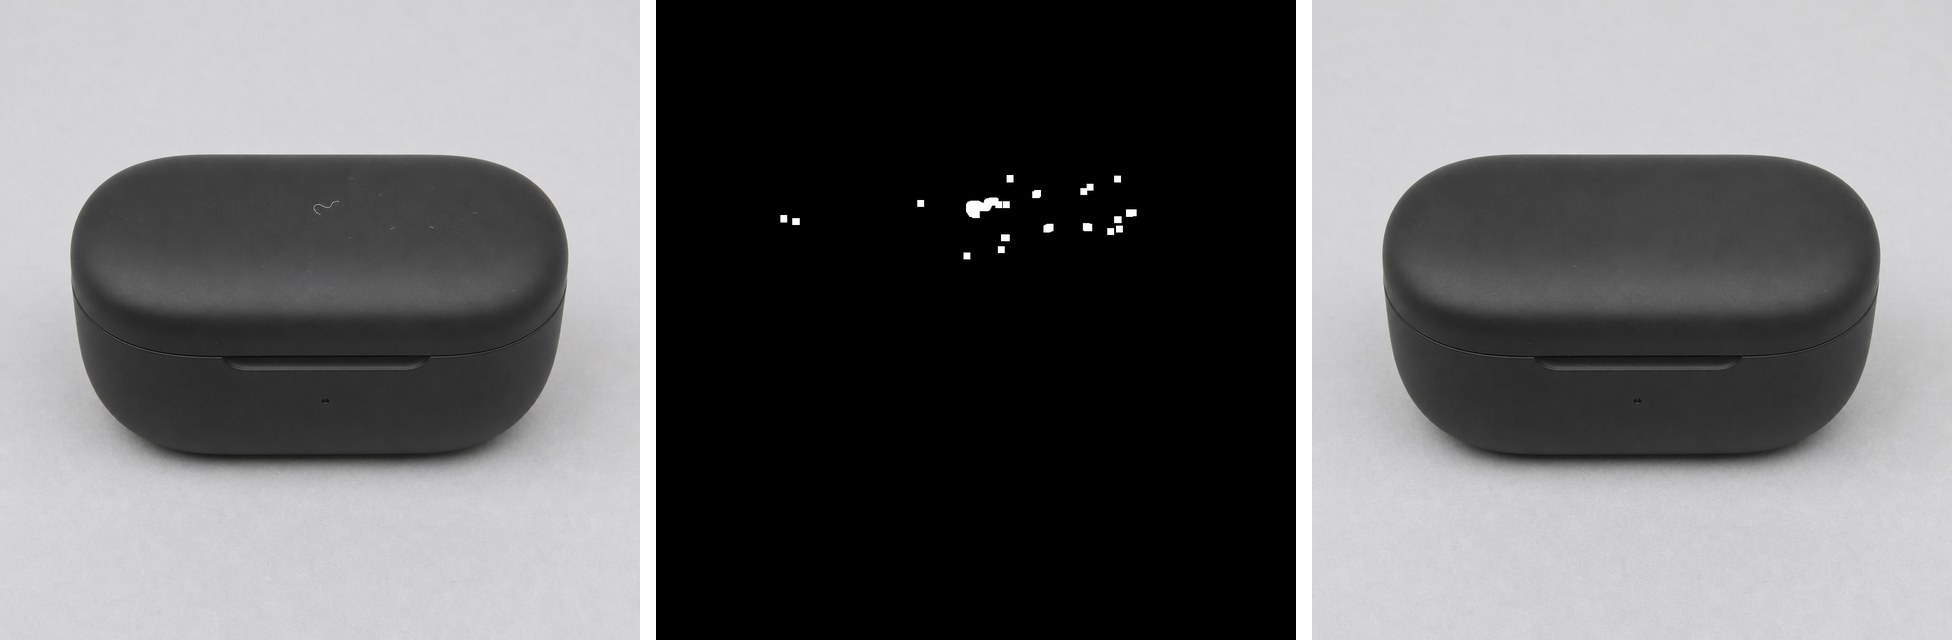
The mask covers 0.35% of the frame. The result removed the lint fiber and all the specks we flagged, and the matte texture across the lid stays continuous. Keep the detection box away from the product edge: our first attempt searched the whole case and also picked up the bright rim of the lid and the backdrop at the corners — that would have asked Eraser to repaint the product's own silhouette.
import numpy as np
from PIL import Image, ImageFilter

src = Image.open("case.png").convert("L")
gray = np.asarray(src).astype(int)
local = np.asarray(src.filter(ImageFilter.MedianFilter(15))).astype(int)

mask = np.zeros(gray.shape, bool)
lid = (slice(265, 410), slice(190, 840))          # rows, cols of the lid top only
mask[lid] = (gray - local)[lid] > 22               # specks brighter than their surroundings

out = Image.fromarray((mask * 255).astype("uint8"))
out = out.filter(ImageFilter.MaxFilter(11))         # grow each speck ~5 px
out.save("case-mask.png")                           # same size as the source
For light products with dark dust, flip the comparison (local - gray). The coordinates are specific to this photo; for a catalog, derive the box from your product cutout or a fixed shooting template.
Case 2: tape and an acrylic wedge on a white sweep
Studio sets leave behind things that hold the product in place. Here a strip of painter's tape and a clear acrylic wedge sit next to a dropper bottle.
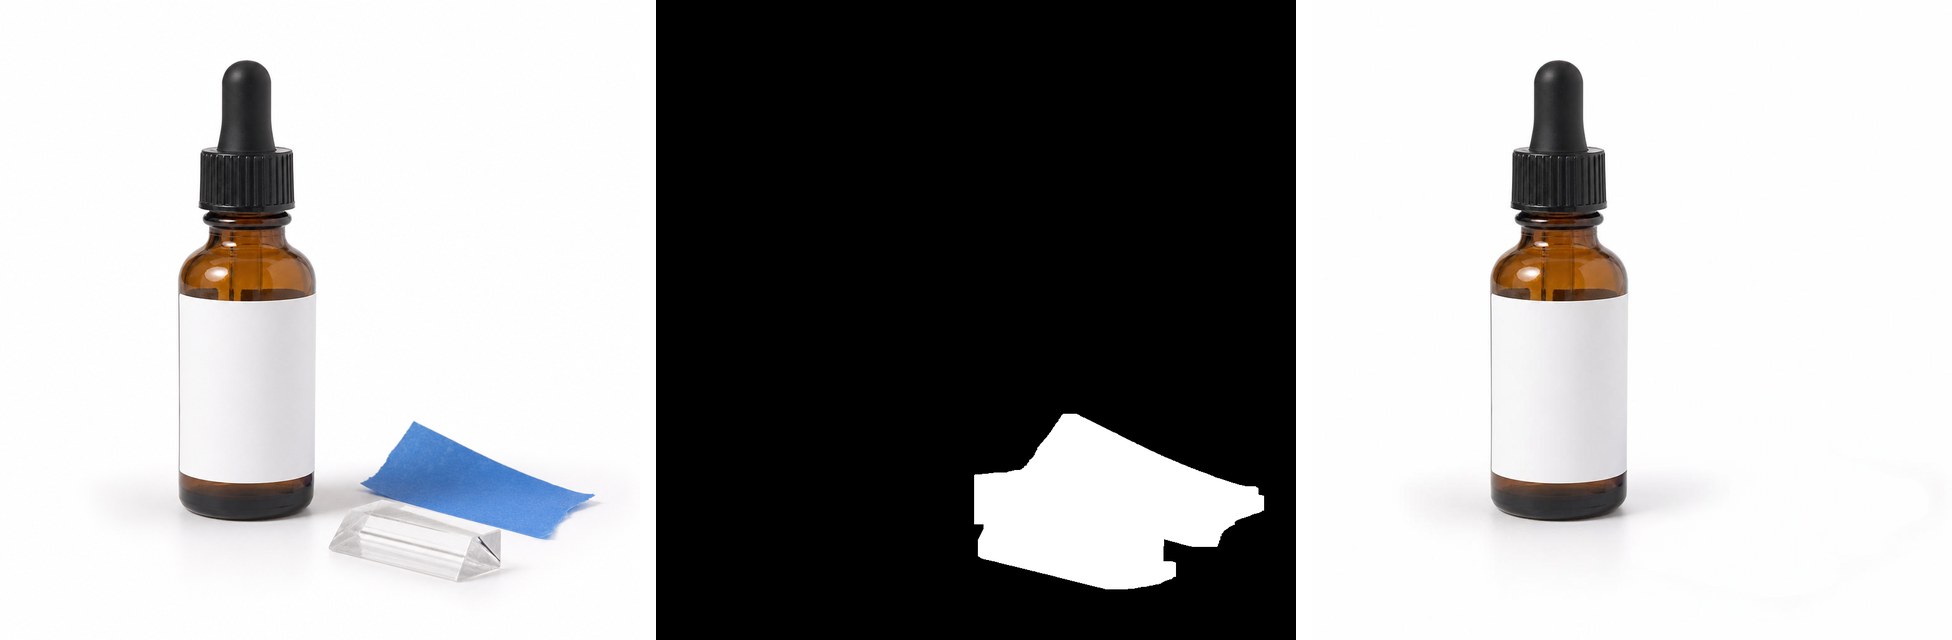
Blue tape is easy to threshold. Clear acrylic is not: its interior is nearly the same white as the sweep, so a threshold only finds its edges. We added a hand-drawn polygon over the wedge to cover it fully. The result shows an empty sweep with the bottle and its shadow untouched.
One thing to check before you upload to a marketplace: the filled area averaged RGB 252, not 255. When we stretched the contrast, the outline of the mask was faintly visible against the surrounding sweep. At normal viewing it is invisible, and the source sweep was not pure white either (about 254). If your channel requires a pure white main image, run your usual background-whitening step after the erase rather than expecting Eraser to produce 255,255,255.
Case 3: cable and cup behind a lifestyle sneaker
Lifestyle shots pick up whatever was on the floor. We masked a charging cable and a paper cup, keeping the polygon a few pixels clear of the shoelaces.
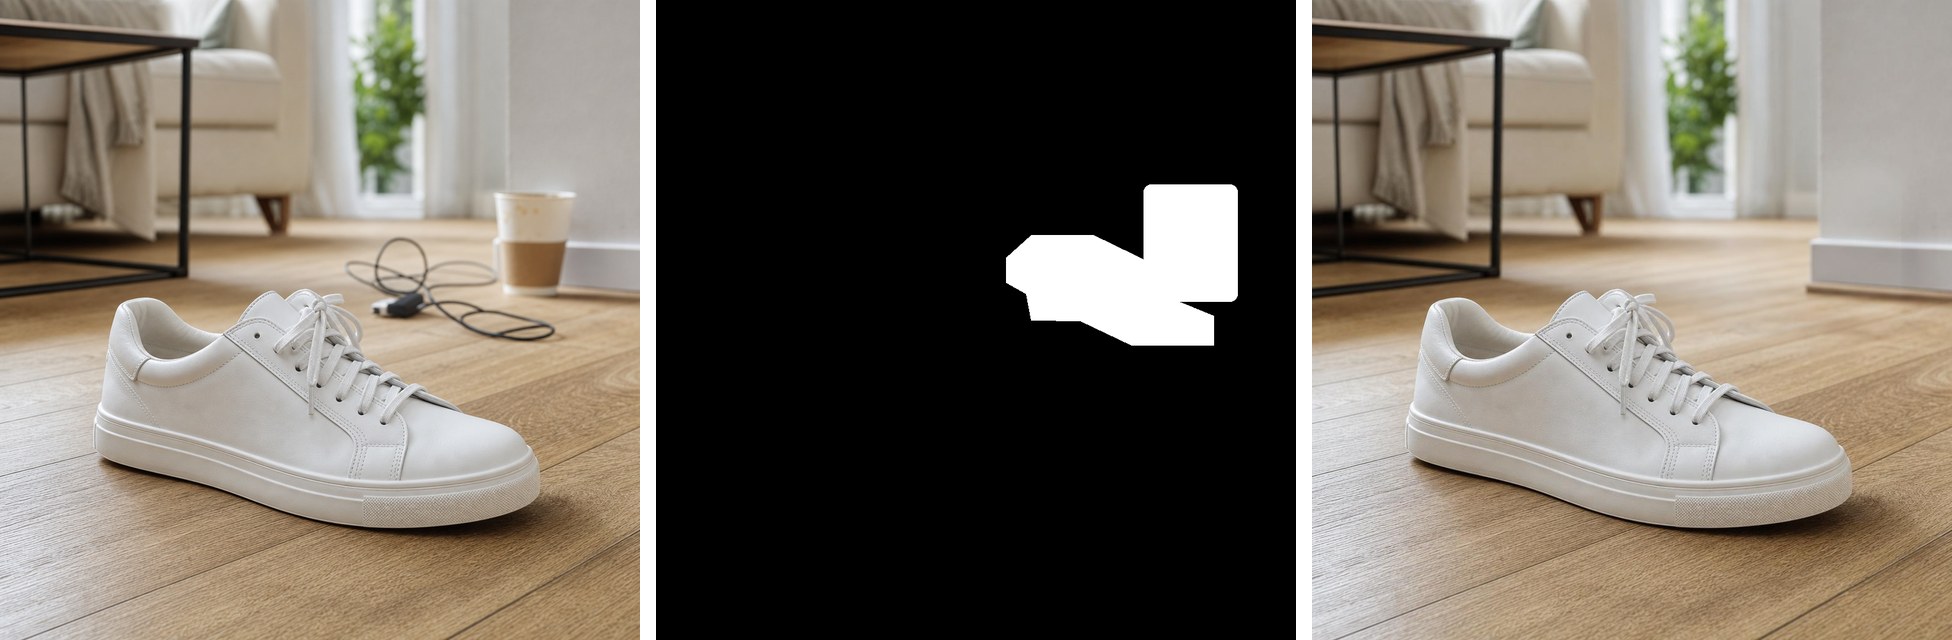
The floorboards continue under the removed cable with consistent grain and blur, and the sneaker is unchanged. The cup was standing against a wall corner, and the mask covered part of that corner, so Eraser had to invent what was behind it: the result has a continuous wall and skirting board with slightly different geometry from the source. That is fine for a product listing, but if the background matters — a branded store interior or a real room in a property listing — check the rebuilt structure, not just whether the object is gone.
Case 4: a softbox reflection on a glossy mug
This is the case to approach carefully. The mask covers the large rectangular highlight on the mug body.
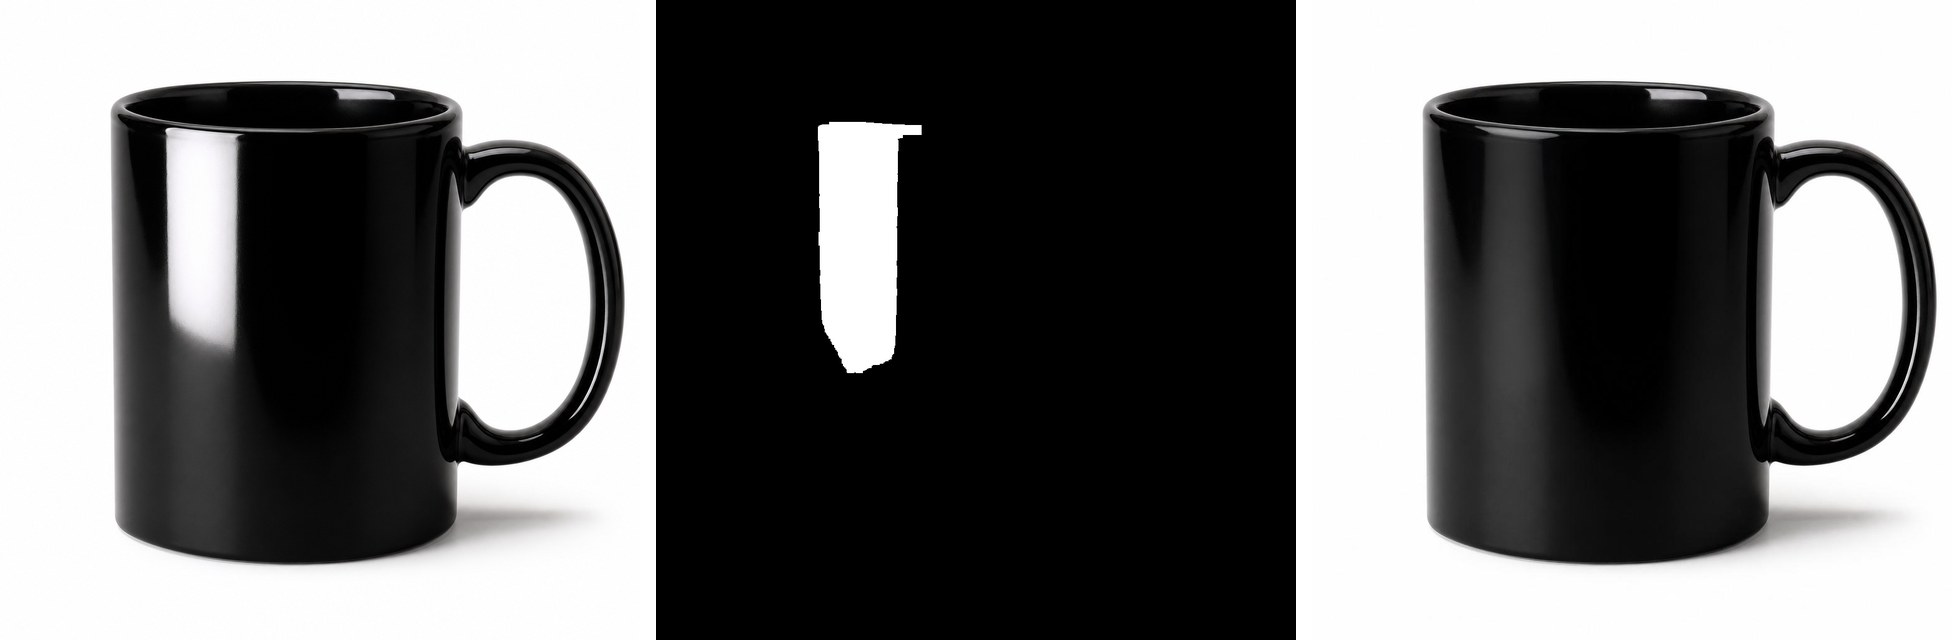
The hotspot is gone and the fill is smooth black. But the reflection was also what told the viewer the glaze is glossy; the cleaned mug reads closer to semi-matte, while the small highlights we did not mask on the rim and handle still say "glossy". For a product sold as high-gloss, removing the highlight entirely can misrepresent the finish. A softer approach is to mask only the harshest part of the hotspot, or reshoot with a diffused light, and decide with whoever owns the product description.
What changed outside the mask
Eraser does not return the untouched pixels byte-for-byte. Comparing source and result outside each mask (mean absolute difference per pixel, 0–255 scale):
| Case | Mean change | 99th percentile |
|---|---|---|
| Dust | 1.1 | 4.7 |
| Props | 0.6 | 6.0 |
| Clutter | 2.1 | 10.7 |
| Reflection | 0.7 | 5.0 |
None of this was visible side by side, and the lifestyle shot — the most textured image — changed the most. If your pipeline composites the result back onto the original (for example, to keep a certified product color exactly), paste only the masked region from the result over the source.
All four outputs were 1024×1024 PNG files with an alpha channel, matching the source size. With preserve_alpha: false and opaque sources, the alpha was fully opaque in every result; preserve_alpha only matters when your input already has transparency.
The request we sent
Each case used the same request shape; only the two URLs changed. Sources and masks must be publicly reachable, and the mask should match the source dimensions.
curl --request POST "https://api.hiapi.ai/v1/tasks" \
  --header "Authorization: Bearer $HIAPI_API_KEY" \
  --header "Content-Type: application/json" \
  --data-raw '{
  "model": "bria-eraser",
  "input": {
    "image_url": "https://static.hiapi.ai/blog/bria-eraser-ecommerce-product-images/dust-src.png",
    "mask_url": "https://static.hiapi.ai/blog/bria-eraser-ecommerce-product-images/dust-mask.png",
    "mask_type": "manual",
    "preserve_alpha": false
  }
}'
Read data.taskId from the response, poll GET https://api.hiapi.ai/v1/tasks/<taskId> until data.status is success, then download data.output[0].url. That URL is temporary, so copy the PNG to your own storage straight away. The Bria Eraser API guide has a full Python polling example and covers failure handling.
We submitted all four tasks concurrently from one script, which is how a catalog batch would run. Store each taskId alongside your SKU and image ID so a timed-out poll can be resumed instead of resubmitted and billed again.
A checklist for catalog cleanup
- Mask the defect, not the product. Keep the product outline, label and logo black. If a defect touches the product edge, accept a slightly smaller mask over a repainted silhouette.
- Grow the mask a few pixels. Dust and tape have soft edges; an exact-fit mask leaves a halo.
- Inspect the fill against the requirement. Pure-white backgrounds, rebuilt architecture and material finish (gloss, texture) are separate checks.
- Keep the original. Archive the source and mask with the result so a reviewer can see what was removed.
- Budget per image, not per defect. One request removes everything in one mask, so combine all defects in a photo into a single mask. At $0.0575 per image, 1,000 cleaned photos cost $57.50 — the pricing breakdown covers batch estimates.
If you are deciding between mask-based and instruction-based editing for this kind of work, the Bria Eraser vs Nano Banana 2.1 comparison runs both on the same photos.
FAQ
Does Bria Eraser need a prompt to know what to remove? No. The mask is the only instruction: white means remove, black means keep. Requests should not include a prompt field.
Can it remove dust automatically without me drawing anything? Eraser needs a mask in every request. The mask can come from code, as in Case 1, so a script can find and mask specks across a batch without manual brushing. Check a sample of the masks before running the batch.
Will it make my product background pure white? Not by itself. In our white-sweep test the filled area averaged RGB 252. Use a separate whitening step if your marketplace requires 255.
Is removing reflections from glossy products safe? It works technically, but removing a highlight can make a glossy product look matte. Mask only the distracting part, and check the result against how the product is described.
Does Eraser change pixels outside the mask? Slightly. We measured an average change of 0.6–2.1 levels out of 255 outside the mask, invisible side by side. Composite the masked region back onto the source if you need exact original pixels.
How long does one cleanup take? Our four runs completed in 36–44 seconds each from submission. Plan polling and timeouts in your own pipeline rather than relying on these figures.
Start with one product photo
Take one real catalog photo with a defect, make its mask at the same size, and run it on the Bria Eraser model page or with the request above. Once one result passes your checklist, script the mask step and run the batch.